
When I was a kid, my Nana had a Queen Anne china cabinet in her dining room that was jam-packed with off-limit goodies. I wanted access to all of it. My filthy, ten-year-old fingers wanted to pry open the tins of sour balls and orange lozenges; work problems on the multiple calculators (Nana, why do you have 26 calculators? Because you never know when you'll need one. Now get out of there); pens and pencils; decks of cards for Canasta; notepads; jars of coins; and chocolate bars past their prime. That cabinet was a treasure chest!
Near the back of the top shelf sat a beautiful Ukrainian egg, shiny black with fine lines and crosshatching. I'm not sure who decorated the egg - I know it wasn't my Nana - but I do know that I wasn't allowed to handle it. I coveted that egg. It was exotic, one-of-a-kind, and absolutely captivating.
Every Easter, I decorated eggs with my mother and brother but it was impossible to replicate the egg. I couldn't draw delicate lines with my stubby, broken crayons and the dyes in my Paas kit were dull and watery. In fact, they were so weak, you could probably drink them. I knew that the ancient relative who made that egg must have had access to specialized instruments and chemical dyes, shit that wasn't available to me in Welland, Ontario in 1979.
In 1999, I was living in Ottawa, on a co-op at the National Library. I read an advertisement in the lobby of the building for a Pysanky workshop at the Ukrainian Orthodox Cathedral. I practically sprinted to the church to sign up.
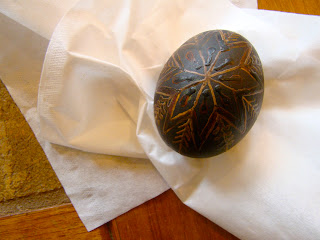
Here's my first attempt at a pysanka:

I am surprised that the egg has lasted. Maybe it's because I rarely let people handle it. Invariably, people want to give the egg a shake. I suppose they're curious about whether the egg's innards have dried up (they have, it's light as a feather).
I store this treasure in a tiny bird's nest that my Mom found on her property. The egg fits inside the nest perfectly, which makes me think that the nest's original inhabitant must have been quite petite.
Last weekend, I hosted an egg decorating party for some friends and their children. Some of the people that attended were new to egg decoration. I love watching people react as they start to remove the wax from their egg. It's like watching a baby being born:

The entire process is illustrated here, and I describe it in more detail below:

Here's my set-up. I use a paper towel as my base, layer a Kleenex over it, and put my candle and saucer of beeswax to my upper right for easy access:

Step 1
After letting your egg rest in a vinegar rinse for a few minutes (2 tbsp of vinegar to a cup of water), beeswax is applied to a raw white or brown egg using a kistka - a plastic or wood-handled stylus with a copper funnel:
The kistka is heated in a candle flame so it can easily scoop up the beeswax. The wax instantly liquifies and lines, dots and other designs can be applied to the egg.
Step 2
The wax designs that you apply in this step will appear white on the finished egg.
Step 3
The egg rests in yellow dye for 5-10 minutes, depending on the intensity of colour that you desire.
Step 4
Remove the egg from the yellow dye, dab it with a Kleenex to dry it off a bit, and apply more wax (lines will be yellow on the finished egg).
Step 5
Use a Q-tip to apply a small amount of green dye to the sections of your egg that you wish to be green. Apply beeswax (designs will be green on the finished egg). Important: the egg doesn't go directly into the green dye because all that green will muddy the orange dye.
Steps 6 and 7
Put the entire egg into the orange dye to neutralize the green, and once it is saturated in colour, remove the egg, dry it off, and apply beeswax (lines will appear orange on the finished egg).
Steps 8 and 9
Dip the orange egg into the jar of red dye. Remove it after a few minutes, blot it off, and apply more wax (designs will be red on the finished egg).
Step 10
Put the egg into the black dye - the final colour - and let it sit until it is as dark as you'd like. Remove it and blot.
This is what the egg looks like once it has been completely covered in wax:
Step 11
The magical moment has arrived! Remove the beeswax from the egg by holding the egg adjacent to the flame. Important: do not hold the egg over the flame because it will turn black from carbon.
When the wax begins to liquify, wipe the egg on a paper towel. Do not wipe the towel on the egg. Repeat this process until all of the wax has been removed from the egg.
In the picture below, you can also see many kistky. The traditional ones are made of wood and copper and newer versions are plastic. The red kistka produces a heavy line, the blue a medium line, and the white, a fine line. There is also a saucer full of beeswax (black from the heat).

Here is a picture of the finished egg. All the wax has been removed. Tada!

Happy Easter, everyone!
Near the back of the top shelf sat a beautiful Ukrainian egg, shiny black with fine lines and crosshatching. I'm not sure who decorated the egg - I know it wasn't my Nana - but I do know that I wasn't allowed to handle it. I coveted that egg. It was exotic, one-of-a-kind, and absolutely captivating.
Every Easter, I decorated eggs with my mother and brother but it was impossible to replicate the egg. I couldn't draw delicate lines with my stubby, broken crayons and the dyes in my Paas kit were dull and watery. In fact, they were so weak, you could probably drink them. I knew that the ancient relative who made that egg must have had access to specialized instruments and chemical dyes, shit that wasn't available to me in Welland, Ontario in 1979.
In 1999, I was living in Ottawa, on a co-op at the National Library. I read an advertisement in the lobby of the building for a Pysanky workshop at the Ukrainian Orthodox Cathedral. I practically sprinted to the church to sign up.
Here's my first attempt at a pysanka:

I am surprised that the egg has lasted. Maybe it's because I rarely let people handle it. Invariably, people want to give the egg a shake. I suppose they're curious about whether the egg's innards have dried up (they have, it's light as a feather).
I store this treasure in a tiny bird's nest that my Mom found on her property. The egg fits inside the nest perfectly, which makes me think that the nest's original inhabitant must have been quite petite.
Last weekend, I hosted an egg decorating party for some friends and their children. Some of the people that attended were new to egg decoration. I love watching people react as they start to remove the wax from their egg. It's like watching a baby being born:

The entire process is illustrated here, and I describe it in more detail below:

Here's my set-up. I use a paper towel as my base, layer a Kleenex over it, and put my candle and saucer of beeswax to my upper right for easy access:

Step 1
After letting your egg rest in a vinegar rinse for a few minutes (2 tbsp of vinegar to a cup of water), beeswax is applied to a raw white or brown egg using a kistka - a plastic or wood-handled stylus with a copper funnel:
 |
| I use the blue one most frequently |
The kistka is heated in a candle flame so it can easily scoop up the beeswax. The wax instantly liquifies and lines, dots and other designs can be applied to the egg.
Step 2
The wax designs that you apply in this step will appear white on the finished egg.
Step 3
The egg rests in yellow dye for 5-10 minutes, depending on the intensity of colour that you desire.
Step 4
Remove the egg from the yellow dye, dab it with a Kleenex to dry it off a bit, and apply more wax (lines will be yellow on the finished egg).
Step 5
Use a Q-tip to apply a small amount of green dye to the sections of your egg that you wish to be green. Apply beeswax (designs will be green on the finished egg). Important: the egg doesn't go directly into the green dye because all that green will muddy the orange dye.
Steps 6 and 7
Put the entire egg into the orange dye to neutralize the green, and once it is saturated in colour, remove the egg, dry it off, and apply beeswax (lines will appear orange on the finished egg).
Steps 8 and 9
Dip the orange egg into the jar of red dye. Remove it after a few minutes, blot it off, and apply more wax (designs will be red on the finished egg).
Step 10
Put the egg into the black dye - the final colour - and let it sit until it is as dark as you'd like. Remove it and blot.
This is what the egg looks like once it has been completely covered in wax:

Step 11
The magical moment has arrived! Remove the beeswax from the egg by holding the egg adjacent to the flame. Important: do not hold the egg over the flame because it will turn black from carbon.
When the wax begins to liquify, wipe the egg on a paper towel. Do not wipe the towel on the egg. Repeat this process until all of the wax has been removed from the egg.
In the picture below, you can also see many kistky. The traditional ones are made of wood and copper and newer versions are plastic. The red kistka produces a heavy line, the blue a medium line, and the white, a fine line. There is also a saucer full of beeswax (black from the heat).

Here is a picture of the finished egg. All the wax has been removed. Tada!

Happy Easter, everyone!
Christine, I made the exact egg as my first pysanka. It was fun. I haven't made many since. But I do have a favorite that has poppy flowers on it. Funny how we both enjoy the same crafts.
ReplyDeleteSue
It must be a common first choice! I love poppies. I'd love to see your egg! Post a pic on FB! I am craft-addicted, I'm afraid. Hope your renos are almost over.
ReplyDeleteTake it easy.